Showing posts with label featured. Show all posts
Showing posts with label featured. Show all posts
Friday, October 30, 2015
Install Nemo With Unity Patches (And Without Cinnamon Dependencies) In Ubuntu
Nemo, the default Cinnamon file manager, needs Cinnamon to be installed, even if you want to use it in some other desktop environment such as GNOME/Unity. That's not the only issue that makes using the latest Nemo under Unity difficult - Cinnamon 2.0 breaks Unity in Ubuntu 13.10, Nemo no longer draws the desktop icons and so on.

I wanted to use the latest Nemo under Unity, but without Cinnamon dependencies so I used the Nautilus Unity patches modified for Nemo by Jacob Zimmermann, which I updated to work with the latest Nemo 2.0.3, and I also added some extra patches to remove the Cinnamon dependencies (except for cinnamon-translations but that shouldn't be an issue), re-enable Nemo to handle the desktop icons and allow Nemo to use GNOME Control Center to change the desktop background or set a picture as wallpaper via context menu.
Since some of you might want to use this modified Nemo in Unity, I uploaded it along with its extensions to a PPA, so you can easily install and use it under Unity (Ubuntu 15.04, 14.10, 14.04 and 12.04).
With these changes, you can completely replace Nautilus with Nemo in Unity, without having to install Cinnamon. Why use Nemo? Well, Nemo comes with a huge number of features that no longer exist in Nautilus as well as some new ones:
- Extra Pane feature (can be enabled via View menu or using the F3 key) as well as an option to always start in split-pane mode;
- Unified, configurable toolbar: you can add/remove the following: up icon, refresh icon, toggle button for the location bar / path bar, home icon, computer icon and search icon;
- Treeview sidebar option;
- Detachable tabs;
- Re-worked statusbar with zoom controls as well as options to toggle displaying the places sidebar, treeview or completely hide the sidebar;
- The main toolbar, menubar and statusbar can be hidden;
- Option to show the full path in the titlebar and tab bars;
- Displays an "elevated privileges" banner when running as root;
- Built in "Open as root" context menu item which uses pkexec instead of gksu;
- Built in "Open in terminal" context menu item;
- Added GTK bookmarks to the MoveTo/CopyTo context menus;
- Added "Set as Wallpaper" to the context menu;
- Switch view buttons on the toolbar (Grid, List and Compact views);
- Drag and drop support for the bookmarks in the sidebar;
- Sidebar: indicators under each drive, displaying the free/used space;
- Type-ahead find feature similar to the one removed from Nautilus starting with version 3.6;
- Collapsable sidebar categories;
- List view:
- columns are now re-orderable by drag and drop;
- you can now right-click a column heading to add or remove visible columns quickly;
- Improved the Open With dialog - you can now add custom mime-type handlers on the fly;
- Much more!
 |
| Nemo dual pane and an "elevated privileges" banner displayed when running Nemo as root |
 |
| Toolbar options |
Thanks to the changes mentioned above, you'll also get Unity integration similar to Nautilus: quicklists, Unity Launcher progress bar when copying files, etc.:
 |
| Nemo Unity integration |
Nemo comes with quite a few extensions ported from Nautilus, such as: Fileroller (File Roller integration), Compare (context menu comparison extension), Dropbox (Dropbox integration for Nemo), Media Columns (displays PDF and audio - mp3, WAV and FLAC - tags as well as EXIF metadata to the Nemo list view), Pastebin (extension to send files to pastebin), RabbitVCS (extension for RabbitVCS integration, a tool that provides access to version control systems such as SVN), Seahorse (extension for Seahorse encryption in GNOME) and Share (extension to share folders using Samba).
 |
| Nemo Media Columns extension adds new audio and image tags to the List View |
All these extensions are available in the Nemo failsdownloads PPA. One extension is missing though: Sushi (a port of the GNOME Sushi extension to Nemo), because I didn't have time to remove its Cinnamon dependencies.
Note that Nemo from our PPA is provided as is, without any guarantees. I'm not a developer and while I was able to fix some minor / easy to fix bugs in the past, I probably won't be able to fix any bugs you may encounter (contributors welcome). If you encounter non-Unity specific bugs, report them upstream.
Install Nemo file manager in Ubuntu (Unity)
Warning: do not use this PPA if you're using Linux Mint or if you use Cinnamon in Ubuntu! Also, if you've added any Cinnamon PPAs, remove them before using the failsdownloads Nemo PPA even if you didn't install Cinnamon, or else the Nemo version in the failsdownloads Nemo PPA might be overwritten.
1. Install Nemo
Update: the PPA now provides Nemo 2.6 for Ubuntu 14.04, 14.10 and 15.04!
Add the PPA and install the latest Nemo with Unity tweaks/fixes by using the commands below:
sudo add-apt-repository ppa:failsdownloadsteam/nemo
sudo apt-get update
sudo apt-get install nemo nemo-fileroller
To launch Nemo, search for "Nemo" in Dash - no application called "Nemo" will show up but instead an application called files should be displayed - that's the app you need to launch. Don't search for "Files" because that will also find Nautilus (which is also called "Files").
2. Optional: Enable thumbnails for files larger than 1 MB.
By default, Nemo only displays thumbnails for files smaller than 1 MB. To change this, from the Nemo menu select Edit > Preferences and on the "Preview" tab, under "Other Previewable Files", set "Only for files smaller than" to the size you want.
2. Optional: Enable thumbnails for files larger than 1 MB.
By default, Nemo only displays thumbnails for files smaller than 1 MB. To change this, from the Nemo menu select Edit > Preferences and on the "Preview" tab, under "Other Previewable Files", set "Only for files smaller than" to the size you want.
Optional: install Nemo extensions
1. To install all the Nemo extensions (remove the extensions you don't want to use from the command below!) use the following command:
sudo apt-get install nemo-compare nemo-dropbox nemo-media-columns nemo-pastebin nemo-seahorse nemo-share nemo-emblems nemo-image-converterFor RabbitVCS Nemo integration, install the following package (requires the RabbitVCS PPA):
sudo apt-get install nemo-rabbitvcs |
| Nemo Terminal extension |
You can also install Nemo Terminal, an extension new, unreleased extension ported from Nautilus-Terminal that embeds a terminal into the Nautilus window:
sudo apt-get install nemo-terminalTip: the embedded Nemo terminal can be hidden using F4. You can disable it on Nemo startup and change various settings via Dconf Editor ("sudo apt-get install dconf-tools"), under org > nemo > extensions > nemo-terminal.
If you want an embedded terminal for Nautilus, see: Nautilus Terminal 1.0 Released With Support For Nautilus 3.x
Update: 4 new extensions were added to the PPA: Nemo Emblems, Folder Color, Image Converter and Filename Repairer
After installing the extensions, I suggest restarting Nemo using the commands below (instead of "nemo -q" which prevented Nemo-Dropbox from working properly in my test for instance):
killall nemo
nemo
2. Fix issue with python-nemo, required by some extensions such as Nemo Terminal, Nemo Media Columns, Nemo RabbitVCS, etc. (Most probably, this isn't required for recent Nemo versions, only use it if certain extensions don't work for you)
There's an issue in Ubuntu (Raring and newer only I believe) that prevents python-nemo from working. Fix it by using the following command:
- 32bit:sudo ln -s /usr/lib/i386-linux-gnu/libpython2.7.so.1 /usr/lib/libpython2.7.so.1
sudo ln -s /usr/lib/libpython2.7.so.1 /usr/lib/libpython2.7.so.1.0sudo ln -s /usr/lib/x86_64-linux-gnu/libpython2.7.so.1 /usr/lib/libpython2.7.so.1
sudo ln -s /usr/lib/libpython2.7.so.1 /usr/lib/libpython2.7.so.1.0If you're still having issues, also try this (64bit):
sudo ln -s /usr/lib/x86_64-linux-gnu/libpython2.7.so.1 /usr/lib/libpython2.7.so.1
sudo ln -s /usr/lib/libpython2.7.so.1.0 /usr/lib/x86_64-linux-gnu/libpython2.7.so.1.0
Extra: Daniel Schürmann maintains Nemo for Unity and GNOME in a GitHub repository. The patches are not identical to the ones used in the failsdownloads PPA and if you want to give it a try, you can built it from source (requires Ubuntu 14.04 or 14.10):
sudo apt-get install git automake
sudo apt-get build-dep nautilus
git clone https://github.com/daschuer/nemo.git
cd nemo
git checkout generic
./autogen.sh
make
sudo make install
Optional: Set Nemo as the default file manager
1. To prevent Nautilus from handling the desktop icons (and use Nemo instead), use the commands below:
- install dconf-tools:
Then, start Nemo (or log out and log back in) and it should draw the desktop icons instead of Nautilus.
- install dconf-tools:
sudo apt-get install dconf-toolsgsettings set org.gnome.desktop.background show-desktop-icons falseThen, start Nemo (or log out and log back in) and it should draw the desktop icons instead of Nautilus.
2. Set Nemo as the default file manager (replacing Nautilus) by running the following command:
xdg-mime default nemo.desktop inode/directory application/x-gnome-saved-searchRevert the changes
If you want to revert the changes and set Nautilus back as the default file manager, firstly let Nautilus draw the desktop icons:
Then, set Nautilus as the default file manager:
gsettings set org.gnome.desktop.background show-desktop-icons trueThen, set Nautilus as the default file manager:
xdg-mime default nautilus.desktop inode/directory application/x-gnome-saved-searchNext, remove Nemo (including all the installed Nemo extensions) and the failsdownloads Nemo PPA:
sudo apt-get remove nemo nemo-*
sudo rm /etc/apt/sources.list.d/failsdownloadsteam-nemo-*.list
Sunday, October 25, 2015
GNOME 3.16 Released With New Notification System, Updated Visuals [Video, Screenshots]
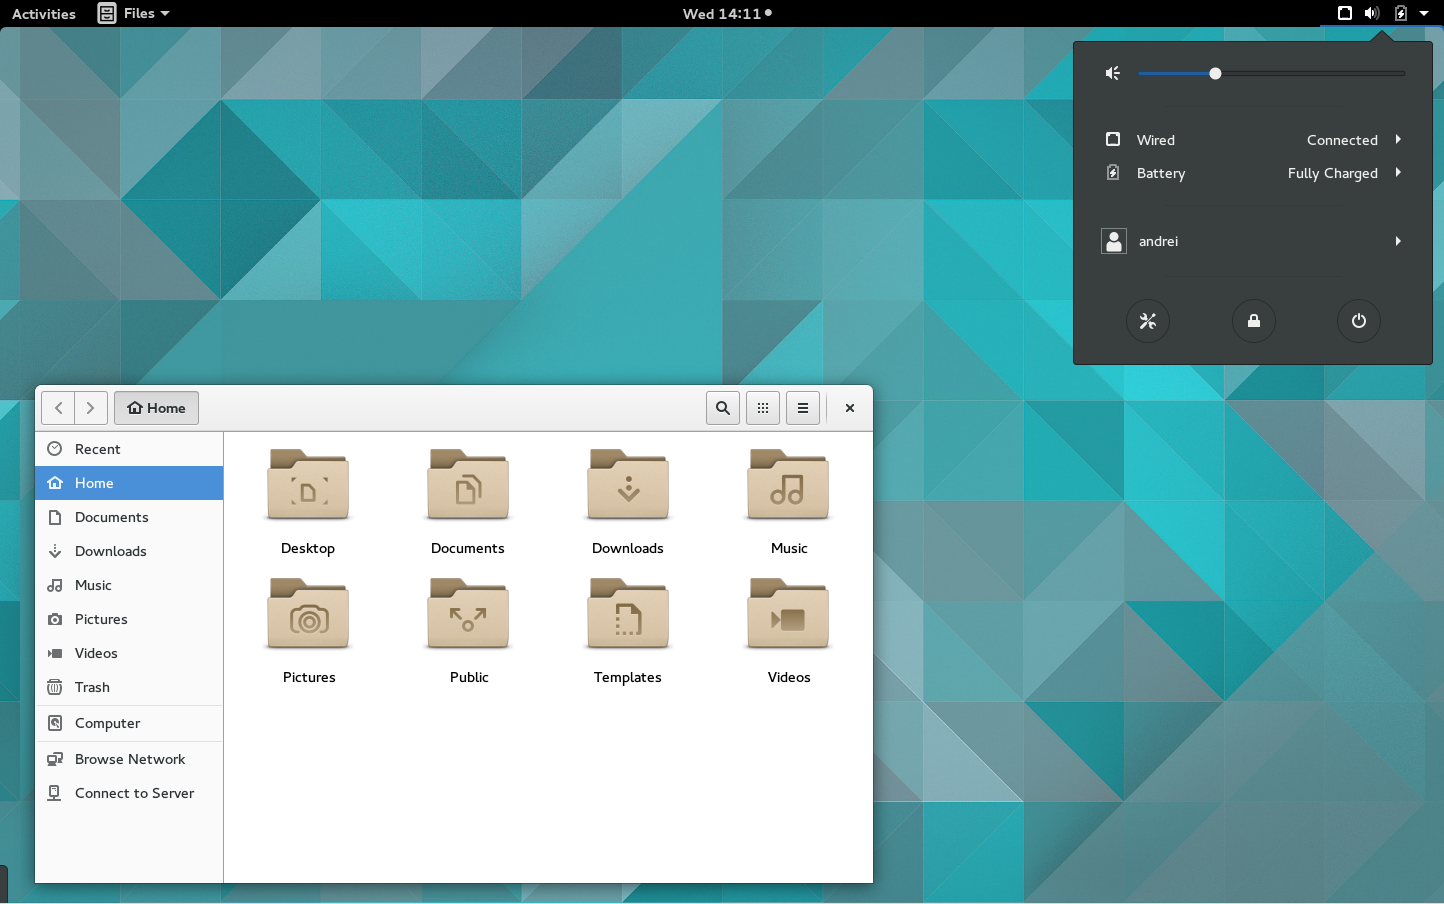
GNOME 3.16 was released today and it includes some important changes, like a new notification system, updated visuals, 3 new preview applications and much more. Read on to find out what's new!
GNOME 3.16 video
Below you can watch a video which presents some of the changes in the latest GNOME 3.16:
(direct video link; for more videos, subscribe to our YouTube channel)
Note that I used VirtualBox for the video, that's why you might notice some lag at times. Also, Maps is not present in the video because it crashes in VirtualBox.
Changes in GNOME 3.16
GNOME 3.16 brings a long-awaited change: a new notification system, which has replaced the old Message Tray. The notification history can now be accessed from the date/time menu (Top Bar):

Furthermore, the date/time menu was redesigned and besides displaying the notifications history, the calendar can now also show world times, as you can see in the screenshot above.
Since the notification history is now displayed at the top, the notification popups (called "banners") were also moved and are now displayed at the top of the screen:

As for legacy "tray" icons, they can still be accessed in GNOME 3.16 and they are displayed in a "drawer" that uses autohide in the bottom left corner of the screen:

To see the new legacy tray in action, see the video above.
Also, the new notifications, the media player controls were removed but they may be reintroduced with GNOME 3.18.
Another important change in GNOME 3.16 is related to the visuals: the Activities Overview, login/lock screen, system menus and others have received an updated design (including monochrome icons for the applications menu):


With GNOME 3.16, the scrollbars were tweaked and instead of being displayed all the time, like in the previous GNOME versions, the new GNOME 3.16 scrollbars are displayed only when needed:

The latest GTK+ 3.16 has received quite a few improvements, such as:
- OpenGL support;
- GTK+ now includes a display system backend for the Mir display server;
- themes can now simultaneously support multiple GTK+ versions, by including version-specific CSS;
- a new widget called GtkPopoverMenu was added and it can be used for creating menus contained with popovers;
- many GTK+ Inspector changes including a much improved user interface.
Other changes include:
- the initial setup assistant now includes a section on privacy controls;
- updated high contrast accessible theme;
- search has been added to the standard file chooser dialog;
- Wayland improvements, such as support for input configuration and pointer barries - with these changes, the Wayland port is "approaching its final stages";
- many other minor improvements and tweaks.
GNOME applications
With this release, GNOME's Image Viewer has been redesigned and it now uses header bars (client-side decorations):

Files (Nautilus) 3.16 comes with bigger icons/thumbnails by default, reorganized menus, improved grid and list views as well as a new popover for changing between views, zoom level and sort order:


Also, with the latest Files app, users can now move files and folders to the trash using the Delete key instead of Ctrl + Delete, like in previous versions (in Ubuntu for instance, Nautilus was patched to allow this in previous versions). To accompany this change, a new, easy to discover undo feature was added:

Another application that has received special attention for this release is Maps, which can now display information bubbles which can display the address, wheelchair accessibility along with links to Wikipedia articles. Also, the latest GNOME Maps comes with built-in Foursquare support, which allows you to check-in (to be able to use it, you must add your Foursquare account to Online Accounts).

Other changes in Maps include:
- contact search: if contacts have address information associated with them, you can search for them directly from Maps
- improved state handling: Maps now gracefully responds when there is no network connection, or when location services are turned off
- route drag and drop: it is now possible to adjust routes by dragging them on the map
Changes in other GNOME apps:
- Calculator now displays previous calculations so you can easily copy previous figures;
- Boxes comes with an updated properties interface, a new menu makes it possible to send keyboard shortcuts that cannot be entered directly into a box and more;
- smart playlists have been added to Music, so you can view frequently played and recently added tracks. It is now also possible to star your favorite tracks;
- Photos and Music have received performance improvements;
- improved GNOME Document Viewer sidebar;
- in Contacts, maps are now shown for contact addresses;
- automatic codecs installation has been integrated into Software;
- two new games were added: a sliding blocks game called Taquin and 2048.
With GNOME 3.16, there are three new preview applications: Calendar (which already comes with Google Calendar sync), Characters (character map application) and Books (e-book viewer):


Furthermore, as a result of a successful crowdfunding campaign, a new IDE for GNOME, called "Builder", is now available as an early preview, and it already features split view, snippets, auto-indentation and a VIM engine but many more features should be added in the future, like project management, debugging, version tracking, Glade integration and others:

And finally, this GNOME release includes a new application, called MultiWriter, which can be used for writing image files to multiple USB devices:

Getting GNOME 3.16
GNOME 3.16 should be available by default in Fedora 22 (currently in alpha) and the next openSUSE release (scheduled for 2015).
Arch Linux users can find the latest GNOME 3.16 in the GNOME unstable repository. Update: GNOME 3.16 is now available for Arch in the extra (stable) repository.
Ubuntu (GNOME) 15.04, which will be released next month, won't include GNOME 3.16 but GNOME 3.14. However, GNOME 3.16 will probably be available with Ubuntu 15.10. The GNOME 3 Staging PPA is in the process of being updated to GNOME 3.16 for Ubuntu 15.04 Vivid Vervet, but it's nowhere near ready yet.
GNOME 3.16 isn't yet available in Debian, with 3.14 being available in both jessie (testing) and sid (unstable).
If you want to try GNOME 3.16, you can do it already by using the official GNOME promo ISO (based on openSUSE):
info and the Maps and MultiWriter screenshots via GNOME release notes
Friday, October 23, 2015
Ubuntu 15.04 Available For Download, See What`s New

Ubuntu 15.04 (Vivid Vervet) was released today and it brings updated applications, various small Unity improvements including an option to always show the menus, along with numerous bug fixes.
Under the hood, the most important change is the replacement of upstart with systemd as the default init system.
Let's take a look at what's new in Ubuntu 15.04 Desktop!
Also see what's new in: Ubuntu MATE 15.04 and the other Ubuntu flavors.
Under the hood, the most important change is the replacement of upstart with systemd as the default init system.
Let's take a look at what's new in Ubuntu 15.04 Desktop!
Also see what's new in: Ubuntu MATE 15.04 and the other Ubuntu flavors.
Changes in Ubuntu 15.04 Desktop (Vivid Vervet)

With Ubuntu 15.04, Unity has received a minor for some, yet important change, requested ever since Unity was first introduced on the Ubuntu desktop: an option to disable the Unity menu autohide (called "always-show-menus"). This feature works with both the AppMenu (global menu), displayed on the top Unity panel as well as LIM (locally integrated menu), displayed in the window titlebar:


The "always show menu" option is not enabled by default and you won't find it in System Settings though. To use it, you must install dconf-editor and use this tool to navigate to com > canonical > unity - here you should find the "always show menus" option:

Furthermore, LIM was tweaked and it now allows accessing the menus of unfocused windows, a feature that wasn't available until now. Thanks to this, you can directly open the menu of an unfocused window by clicking on it, without having to firstly focus the window. If you don't like this behavior, you can disable it via Dconf Editor: com > canonical > unity > integrated-menus > unfocused-windows-popup.
It's important to mention that the "always show menus" feature was already backported to Ubuntu 14.04 so if you're using Trusty, you can enable it as explained above, as long as you've installed the latest Unity update.
Those are not the only menu changes in Ubuntu 15.04 (Vivid Vervet)! Thanks to JAyatana, which is now installed by default, Java Swing applications now support the Unity AppMenu and HUD:

This feature wasn't backported to Ubuntu 14.04 but you can install JAyatana by using a PPA.
Other Unity and Compiz changes include:
- Dash, HUD and the logout dialogs now work over fullscreen windows;
- tweaks to animations for faster startup and shutdown experiences;
- fixes for various problems that occur with the nVidia proprietary driver (mostly blank or black windows);
- many bug fixes and small improvements.
I should also mention that LIM was set as the default menu type in Ubuntu 15.04 Vivid Vervet back in February but this change was reverted with just three days before the final Ubuntu 15.04 release.
Another visual change in Ubuntu 15.04 was made to the default GTK themes (Ambiance and Radiance), which provide better client side decoration (also known as header bars) app integration, along with other tweaks:

Unfortunately client side decoration apps don't have any shadows under Unity and at least on my system, there's an nasty visual bug caused by overlay scrollbars which makes CSD apps pretty much unusable.

And finally, here's the new Ubuntu 15.04 default wallpaper:

As for under the hood changes, the most important is the replacement of upstart with systemd as the default init system. While Ubuntu 15.04 boots with systemd by default, there's an option in GRUB to boot with upstart:

This option is useful if you encounter issues when booting with systemd - for instance some users reported a slow boot process a while back and I'm not sure if those issues were fixed because this doesn't occur on my system (in fact, the boot process takes pretty much the same with systemd and upstart on my system while the shutdown process is a lot faster with systemd).
Also, Upstart continues to control user sessions.
Also, Upstart continues to control user sessions.
Applications / packages
Ubuntu 15.04 ships with GTK 3.14.12 and quite a few GNOME applications were updated to version 3.14: Nautilus (for instance, Ubuntu 14.10 has Nautilus 3.10), GNOME Terminal (Utopic has an ancient version: 3.6.2), Totem (updated from 3.10.1, which is in Utopic), Evince, Eye of GNOME, File Roller (Archive Manager) and Disks, while GNOME System Monitor was updated to version 3.15.91.
Among these, there are many apps that use client side decorations by default, but they were patched to use a traditional titlebar / menu under Unity:
 |
| Document Viewer (Evince) |
 |
| Videos (Totem) |
 |
| GNOME System Monitor & Disks |
Gedit is still at version 3.10 (3.10.4) in this Ubuntu release and it's the only GNOME app that wasn't updated to version 3.14 (I hope I didn't miss any), excluding Brasero and Empathy, which didn't have a 3.14 release and are still at version 3.12.
Vivid doesn't ship with GTK 3.16 (and 3.16 GNOME apps) because GNOME 3.16 was released recently and Ubuntu 15.04 had its feature freeze on February 19th.
It's also important to mention that GNOME Shell 3.14.4 is available in the repositories (and available by default in Ubuntu GNOME 15.04 obviously), along with the 3.14.x version of GNOME Control Center, GNOME Settings Daemon, GDM and most GNOME apps like Maps, Weather, Clocks, Bijiben, Music, Photos, Boxes as well as GNOME games like Mines and Sudoku.
Other applications installed by default in Ubuntu 15.04: Firefox, Thunderbird 31.6.0, LibreOffice 4.4.2, Rhythmbox 3.1, Ubuntu Software Center 13.10, Transmission 2.84, Deja Dup 32 and Shotwell 0.20.2 on top of Unity 7.3.2 (+dailybuild).
It's also worth mentioning that Ubuntu Make (previously called Ubuntu Developer Tools Center) is now available in the official repositories. This is a command line tool which makes it easy to install various developer tools such as Android NDK and Android Studio, various other IDEs such as IDEA (ultimate and community editions), PyCharm, WebStorm, RubyMine, PhpStorm and Eclipse, Golang compiler, Firefox developer edition, Dartlang editor and Stencyl game development platform.
The tool automatically installs all required dependencies and does everything you need to run the tools listed above, including automatically adding the IDEs to the Unity Launcher for easy access.
It's also worth mentioning that Ubuntu Make (previously called Ubuntu Developer Tools Center) is now available in the official repositories. This is a command line tool which makes it easy to install various developer tools such as Android NDK and Android Studio, various other IDEs such as IDEA (ultimate and community editions), PyCharm, WebStorm, RubyMine, PhpStorm and Eclipse, Golang compiler, Firefox developer edition, Dartlang editor and Stencyl game development platform.
The tool automatically installs all required dependencies and does everything you need to run the tools listed above, including automatically adding the IDEs to the Unity Launcher for easy access.
Under the hood, Ubuntu 15.04 uses the Ubuntu Linux Kernel 3.19.0 based on the upstream 3.19.3 Linux Kernel (see what's new in: Linux 3.18 | 3.19), Mesa 10.5.2, Xorg server 1.17.1, PulseAudio 6.0 and systemd 219.
Download Ubuntu 15.04 (Vivid Vervet)
Download Ubuntu 15.04 | official release notes (includes upgrade instructions)
Like all non-LTS releases, Ubuntu 15.04 will be supported for 9 months.
Make sure you read the official release notes linked above before installing Ubuntu 15.04!
Also see what's new in: Ubuntu MATE 15.04 and the other Ubuntu flavors.
Saturday, October 17, 2015
Get A Global Menu In MATE 1.8 With TopMenu (PPA For Ubuntu And Linux Mint)
One of the most requested MATE features is the addition of a global menu applet. However, such an applet (called TopMenu) already exists, though it's not available in any PPA and that prevents many Ubuntu / Linux Mint users from installing it.
To make it easier to install, I've packed TopMenu in a PPA for Ubuntu 14.04 (requires using Ubuntu MATE or upgrading to MATE 1.8 via PPA) and 14.10 as well as Linux Mint 17 and 17.1 (MATE edition, obviously).
TopMenu is compatible with MATE 1.8 (a MATE 1.8 panel applet is shipped) and it fully supports GTK2. According to its homepage, GTK3 is partially supported (I didn't encounter any functionality issues in my test) and there are additional plugins for Qt4 and Mozilla apps (Firefox and Thunderbird). I should also mention that unlike Unity's AppMenu, TopMenu doesn't autohide and it's always visible when an application is focused.
Here are a few TopMenu screenshots taken under Ubuntu MATE:
 |
| TopMenu - GTK2 app |
 |
| TopMenu - GTK3 app |
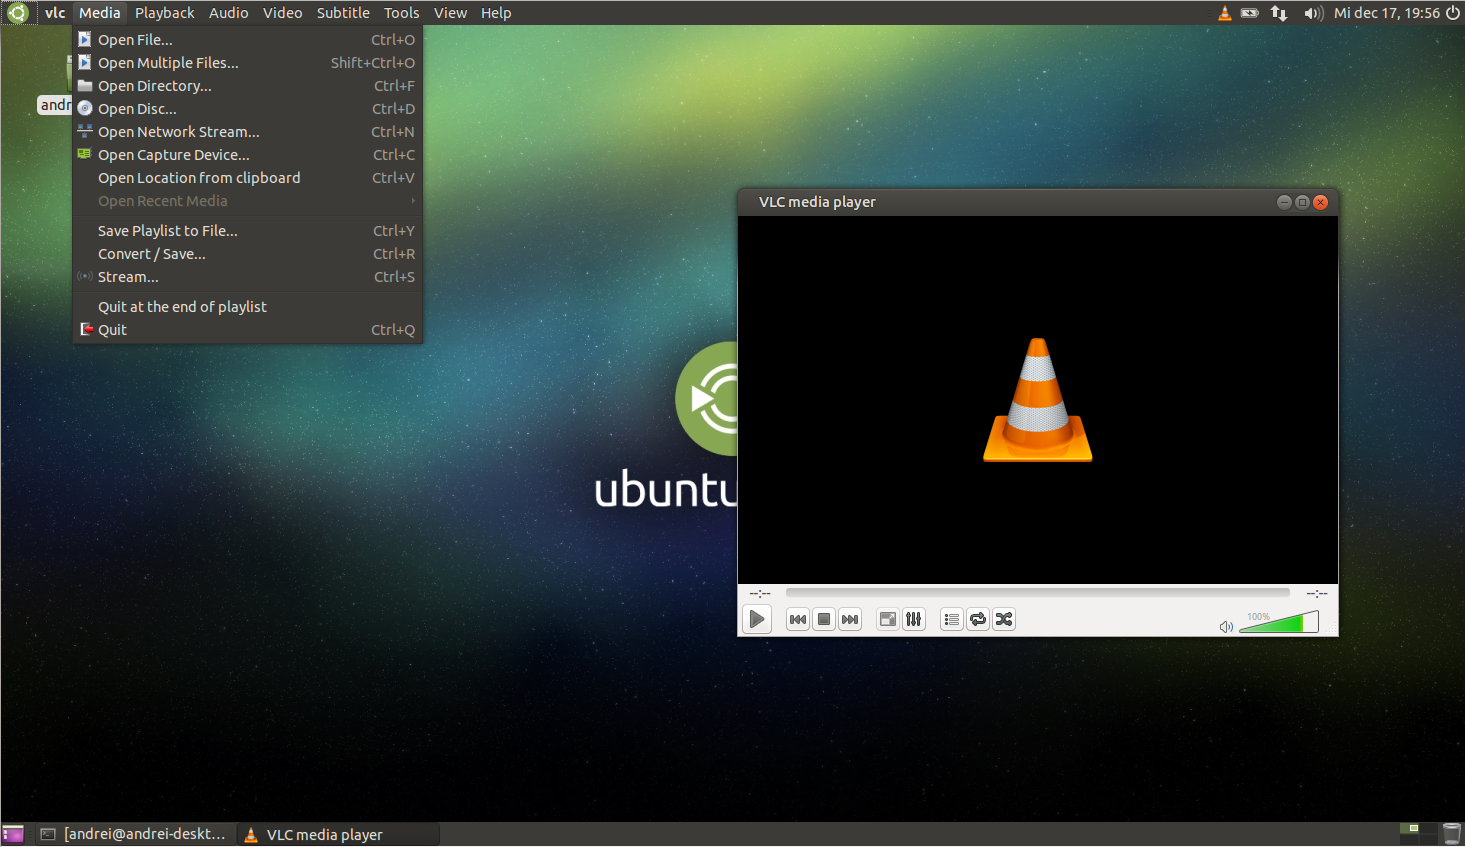 |
| TopMenu - Qt app |
 |
| TopMenu Firefox extension |
For technical information about TopMenu, see its homepage.
Important notes (please read!):
- TopMenu is not considered stable and according to its homepage, GTK3 is only partially supported, so you may encounter bugs or it may not work at all for you;
- I had to tweak TopMenu GTK3 to render properly (some colors were hard-coded and it didn't respect the panel colors) but it's still not perfect and some stuff won't look properly - for instance, when using a transparent panel;
- if you want to remove TopMenu installed from our PPA, use "purge" instead of remove (this should completely remove it: "sudo apt-get purge libtopmenu-*") - that's required to remove the script the package adds under /etc/profile.d/;
- the PPA provides the latest TopMenu from Git;
- TopMenu from our PPA only works with MATE 1.8. To be able to use it in Ubuntu 14.04 (if you don't use Ubuntu MATE 14.04), you'll have to install the latest MATE via PPA.
How to get a global menu under MATE 1.8 with TopMenu in Ubuntu or Linux Mint
1. Install TopMenu
Firstly, let's install TopMenu. To add our PPA and install TopMenu for MATE 1.8 in Ubuntu 14.04 (if you don't use Ubuntu MATE 14.04, you'll have to install MATE 1.8 via PPA), 14.10 or 15.05 / Linux Mint (MATE edition) 17 or 17.1, use the following commands:
sudo add-apt-repository ppa:failsdownloadsteam/mate
sudo apt-get update
sudo apt-get install mate-topmenu-applet
Installing "mate-topmenu-applet" should install all the extra plugins which bring support for GTK3, Qt and Mozilla, which are added them as "recommended" packages (so you're not forced to install all of them). In case some of those plugins are not installed automatically (like in Linux Mint, which doesn't install recommended packages by default), you can use the command below to install them:
sudo apt-get install libtopmenu-gtk3 libtopmenu-qt topmenu-mozilla-extensionArch Linux users can install TopMenu via AUR: for GTK2 | GTK3 | Qt (you must load it manually as explained on the TopMenu homepage).
Other Linux distributions: see the instructions @ TopMenu homepage.
2. Once TopMenu has been installed, log out and log back in - this is required to load the TopMenu modules.
3. Adding the TopMenu applet to the MATE 1.8 panel.
Before adding the TopMenu applet to the MATE panel, it's important to mention that the default MATE "Menu Bar" will stop working so instead of this applet, you'll have to use either the "Main Menu" applet or the "MATE Menu" applet. If you have the Menu Bar applet added to the panel, remove it before proceeding!
To add TopMenu to the MATE panel, right click the panel in an empty area and select "Add to panel" and add "TopMenu Panel Applet":

Then, open some application that has a menu (try it with a GTK2 app firstly, like Caja), move the menu to the position you want it to be displayed, right click it and select "Lock to panel". If you don't do this, the TopMenu applet position will reset after a logout.
Update: if you use Xfce, see: Use A Global Menu In Xubuntu Or Linux Mint Xfce Via A New TopMenu Plugin [PPA]
Friday, October 16, 2015
10 Things To Do After Installing Ubuntu 14.04 Trusty Tahr To Get A Near Perfect Desktop
Ubuntu 14.04 LTS (Trusty Tahr) will be released tomorrow and since many of you will install it as soon as it's released (or maybe you're already using Ubuntu 14.04), here's a list of 10 useful things to do to get a near perfect desktop.

While the tweaks below are targeted at Unity, many of them also work with other Ubuntu flavors like Xubuntu, Kubuntu, Lubuntu or Ubuntu GNOME.
Update: the instructions / things to do below also apply for the latest Ubuntu 14.10 (Utopic Unicorn), except for:
Update: the instructions / things to do below also apply for the latest Ubuntu 14.10 (Utopic Unicorn), except for:
- 1.2 (Pidgin Indicator is no longer required because Pidgin now ships with a Unity integration plugin; you can still use Pidgin Indicator if you want though);
- 3.1 (Firefox now supports H224 without any tweaks);
- 4.1 (you can continue to use Pipelight for various web services that require Silverlight, but that's no longer required for Netflix - to use Netflix with HTML5, simply install Google Chrome and it should work without any additional tweaks - that's now also the case for Ubuntu 14.04).
1. Install Ubuntu AppIndicators (applets)
Ubuntu ships with just a few indicators by default because well, it can't guess what everybody needs. So here are some indicators you might find useful.
1.1 Calendar Indicator is one of my favorite Ubuntu indicators. This AppIndicator displays your 10 upcoming events in the indicator menu, can add new events (which of course, are synced with Google Calendar) and it has a complete calendar view where you can see all your Google Calendar events, edit or add new events, etc.

To install Calendar Indicator in Ubuntu 14.04, use the following commands:
sudo add-apt-repository ppa:atareao/atareao
sudo apt-get update
sudo apt-get install calendar-indicator
1.2 Pidgin may not be the default IM client for a few Ubuntu releases, but it's still a very popular application. Pidgin uses a tray icon by default but you can now use an AppIndicator which is especially useful since the old Unity systray whitelist is no longer available.

Pidgin Indicator is not an part of Pidgin by default but it works great and you can install it in Ubuntu 14.04 by using the main failsdownloads PPA:
sudo add-apt-repository ppa:nilarimogard/failsdownloads
sudo apt-get update
sudo apt-get install pidgin-indicator
Once installed, open Pidgin and from its menu select Tools > Plugins, then scroll down until you see a plugin called "Ubuntu Indicator" and enable this plugin.
1.3 Since Ubuntu doesn't ship with a weather indicator, I recommend My Weather Indicator, an appindicator that displays the current weather on the Unity top panel. The tool can also display a 5-day forecast (it depends on which Weather service you use), it comes with some very nice (optional) desktop widgets and more.

To install it in Ubuntu 14.04, use the following commands:
sudo add-apt-repository ppa:atareao/atareao
sudo apt-get update
sudo apt-get install my-weather-indicator
1.4 Variety is more of a fully featured application than just a simple AppIndicator, but I'll add it here anyway since I'm sure many of you will love it.

Variety is a wallpaper changer that automatically downloads and changes your wallpaper on a given interval. Using it, you'll get cool, fresh wallpapers each day. Or each hour. Or... well, it's up to you when the wallpaper changes. From the AppIndicator menu you can quickly switch to the next (random) wallpaper or copy the wallpaper to favorites, for later use.
To install Variety in Ubuntu, use the following commands:
sudo add-apt-repository ppa:peterlevi/ppa
sudo apt-get update
sudo apt-get install variety
1.5 Cpufreq Indicator is the equivalent of the old GNOME CPU frequency scaling applet which can be used for changing the CPU frequency on-the-fly. Install it in Ubuntu by clicking the button below:

Or install it from the command line:
sudo apt-get install indicator-cpufreq
Note that Cpufreq Indicator doesn't work with Intel P-State (see 8.2).
For more Ubuntu indicators, see our AppIndicator tag.
2. Tweak Unity
2.1 Some Unity settings are available in the Appearance settings, some in CCSM, some can only be accessed via Dconf and so on. With Unity Tweak Tool, you have access to almost all these settings in one place, using a very nice user interface.

Unity Tweak Tool allows you to change various Unity settings, like auto-hide behavior, tweak the Dash, the Unity Launcher or HUD, change window snapping and hot corner settings, change the GTK and icon theme, access various font settings and more.
To install Unity Tweak Tool from the Ubuntu Software Center, click the button below:
Or, install it in Ubuntu 13.10 via command line:
sudo apt-get install unity-tweak-tool2.2 Privacy
By default, Dash displays all the recently accessed files along with other files found on your system. But you can change this by selecting Security & Privacy from System Settings, and then tweak everything to suit your needs:

On the Search tab, you can select to disable online search results from being displayed in Dash. However, you may want to use some scopes so instead of completely disabling this, you can open Dash and on the applications lens (the second lens) click "Filter results", then select "Dash plugins" - here, you can enable/disable any Dash plugin you want:

To disable a plugin, click it and then simply click "Disable":

If you want to disable the shopping suggestions, you can run the following command in a terminal:
gsettings set com.canonical.Unity.Lenses disabled-scopes "['more_suggestions-amazon.scope', 'more_suggestions-u1ms.scope', 'more_suggestions-populartracks.scope', 'music-musicstore.scope', 'more_suggestions-ebay.scope', 'more_suggestions-ubuntushop.scope', 'more_suggestions-skimlinks.scope']"2.3 An option to enable minimize on click for the Unity Launcher was one of the most requested Ubuntu features and you can now enable this in Ubuntu 14.04.
Update: Unity Tweak Tool was updated with an option to enable minimize on click for the Unity Launcher.
To enable minimize on click for the Unity Launcher (Unity Tweak Tool doesn't support this yet), install CompizConfig Settings Manager. You can install it by clicking the button below:
Or, to install it via command line, use:
sudo apt-get install compizconfig-settings-managerThen, open CompizConfig Settings Manager from Dash, click the "Ubuntu Unity Plugin" and on the Launcher tab, enable "Minimize single window applications (unsupported)":

Note that this feature only works with single window applications.
2.4 Try the new locally integrated menus (LIM)
Ubuntu 14.04 ships with a new (non-default) type of menu called "LIM", or "locally integrated menu". Locally integrated menus are displayed in the window decorations for unmaximized windows, instead of the default Unity approach which is to display the menu on the top panel, and are displayed on mouse over.

Since the Unity global menu is not appreciated by everybody, maybe you'll find LIM better, so give it a try. To enable it, open System Settings > Appearance and on the Behavior tab, select to show the menus "in the window's title bar":

3. Fixes
3.1 Get Firefox to support H.264
The FFmpeg plugin for GStreamer 0.10 is not available in the official Ubuntu 14.04 repositories (because FFMpeg is not available either - libav is used instead) and because of this, Firefox doesn't support the H.264 codec.
Furthermore, without the FFmpeg plugin for GStreamer 0.10 package, KDE apps can't play H.264 videos in Kubuntu 14.04 if they use the GStreamer backend. Another issue with this is that Amarok can't play WMA files. There might also be other affected applications.
Before:

After:

To "fix" this, all you need is install the "gstreamer0.10-ffmpeg" package and its dependencies. If you've upgraded from an older Ubuntu version, this package might already be installed but if this is a fresh install, you can get the package from a PPA. Add the PPA and install it using the following commands:
sudo add-apt-repository ppa:mc3man/trusty-media
sudo apt-get update
sudo apt-get install gstreamer0.10-ffmpeg
3.2 Fix Skype not using the correct system theme on 64bit
On 64bit Ubuntu systems, Skype uses the Clearlooks theme instead of the default Ubuntu theme, Ambiance (this also happens with other themes).
This occurs because Skype is a 32bit application and the GTK2 theme engine (Murrine or Pixmap in most cases) is not installed for 32bit.
Before:

After:

To fix this, you need to install the 32bit Murrine and Pixmap GTK2 engines:
sudo apt-get install gtk2-engines-murrine:i386 gtk2-engines-pixbuf:i3863.3 Fix missing Skype tray icon / appindicator on Ubuntu 64bit

On 64bit, the required package to get a Skype tray / appindicator icon is not installed automatically. To fix this, use the following command:
sudo apt-get install sni-qt:i3864. Web browser (Firefox, Google Chrome / Chromium) tweaks
4.1 Firefox, Google Chrome/Chromium: if you want to use services such as Netflix, Maxdome and others, you can use Pipelight. Pipelight lets you use Microsoft Silverlight, Widevine (the built-in Chrome Widevine doesn't work with many websites), and more with native Linux web browsers (Pipelight itself uses Wine).

Before installing Pipelight, it's strongly recommended to close your web browser. Without doing this, the plugin may fail to install or crash the browser (you can copy the instructions below to a text editor).
To install Pipelight in Ubuntu 14.04, you can use its official PPA. Add the PPA and install Pipelight using the commands below:
sudo apt-add-repository ppa:pipelight/stable
sudo apt-get update
sudo apt-get install pipelight-multi
Then, install the Silverlight plugin using the following command:
sudo pipelight-plugin --enable silverlightTo install the Widevine plugin, use the command below:
sudo pipelight-plugin --enable widevineA lot more about Pipelight, here: Pipelight: Use Silverlight In Your Linux Browser To Watch Netflix, Maxdome Videos And More
4.2 Chromium will soon stop using the Netscape Plugin API, and as a result, the Linux Adobe Flash will stop working. To get Flash working in Chromium, you can use the Pepper Flash Player installer (Pepper Flash is extracted from Google Chrome), which is available in the official Ubuntu 14.04 repositories. To install it, use the following commands:
sudo apt-get install pepperflashplugin-nonfree
sudo update-pepperflashplugin-nonfree --install
For more about this, see: Pepper Flash Player Installer For Chromium Available In The Ubuntu 14.04 Repositories
4.3 Firefox doesn't use native notifications under Linux. A work-around for this issue is to use GNotifier, a Firefox extension that makes the browser use native notifications on the Linux desktop. The extension currently supports GNOME (Shell), Unity, KDE and Xfce.


The extension is available HERE and doesn't require restarting the browser after it's installed.
5. LibreOffice tweaks
LibreOffice has 2 cool features (well, one of them isn't exactly a feature but anyway) that aren't enabled by default: a sidebar that enables quick access to document styles, formatting, etc. and a cool new monochrome icon set.

5.1 To enable the LibreOffice sidebar, simply select View > Sidebar from the LibreOffice menu.
5.2 To use the monochrome icon set, firstly install it by clicking the button below:
Or, install it via the command line using:
sudo apt-get install libreoffice-style-sifrAnd then to activate it, from the LibreOffice menu select Tools > Options > LibreOffice > View and select "Sifr" under "Icon size and style":
6. Nautilus "tweaks"
The heading says "tweaks" in quotes because one of them is not exactly a tweak, but a replacement.
6.1 Use the search / type-ahead feature that suit your needs
In Ubuntu 14.04, Nautilus was patched to use type-ahead find instead of its default behavior for a few Nautilus releases, which is recursive search. However, there's a Dconf option you can use to switch between these two behaviors.
Type-ahead find allows to type the name of a directory or file in the file manager to select it without searching in the sub-folders while the recursive search is, like the name suggests, a search inside the current folder and all its sub-folders.
 |
| Recursive search |
 |
| Type-ahead find |
To switch to recursive search in Nautilus under Ubuntu 14.04, use the following command:
gsettings set org.gnome.nautilus.preferences enable-interactive-search falseIf you want to switch back to type-ahead find ("interactive search"), use the command below:
gsettings set org.gnome.nautilus.preferences enable-interactive-search trueMore info: Nautilus Type-Ahead Find Feature Enabled By Default In Ubuntu 14.04
6.2 If you don't like Nautilus 3.10, switch to Nemo
As you know, Ubuntu 14.04 uses Nautilus 3.10 as the default file manager. Nautilus is nice, but it lacks many features it once used to have, like the dual pane view (which was triggered using F3). You can get this back by using Nemo, which I patched to work properly under Unity and to get rid of the Cinnamon dependencies (the original patches were created by Jacob Zimmermann, I just updated them for a newer Nemo version and added some other patches for better desktop integration).

Since there are some quite a few things you should know before replacing Nautilus with Nemo in Ubuntu 14.04, I won't post the instructions here, but you can read all about it in an article I posted a while back: Install Nemo With Unity Patches (And Without Cinnamon Dependencies) In Ubuntu (it includes instructions for replacing Nautilus with Nemo, installing some Nemo extensions as well as how to revert the changes in case you want to go back to Nautilus as the default file manager).
7. Nvidia Optimus tweaks
Note for AMD hybrid graphics users: you can use fglrx-pxpress and AMD Indicator which are basically the equivalents of the tweaks below for AMD, but since my laptop uses Nvidia Optimus, it means I can't test this on AMD hybrid graphics so I won't post instructions here. See the Ubuntu wiki for more info.
7.1 Switch between Nvidia and Intel graphics
Installing nvidia-prime can get your system to boot in low graphics mode if it's not used properly so be careful. This should be considered an "expert" feature and should only be used by those who know how to fix their system in case something goes wrong!
It's also important to note that you need to use LightDM (so this won't work for Ubuntu GNOME users by default because it uses GDM - you'll need to switch to LightDM) and the proprietary Nvidia drivers!
In Ubuntu 14.04, you can switch between the Nvidia and Intel graphics from the Nvidia Settings. Firstly, install nvidia-prime:
sudo apt-get purge bumblebee*
sudo apt-get install nvidia-prime
(the first command makes sure all the Bumblebee packages were purged - without this, nvidia-prime won't work)
Then simply open Nvidia Settings, select "PRIME Profiles" on the left and select the graphics card you want to use:

Note that switching between CPUs requires a logout so you can't for instance run the desktop using the Intel graphics while running a game using the Nvidia graphics under the same session. For that you can continue to use Bumblebee, but unfortunately you can't use both, so remove nvidia-prime if you want to use Bumblebee.
7.2 Prime Indicator (requires the nvidia-prime package, see 7.1)

To quickly switch between the Intel and Nvidia graphics or see which graphics card is currently in use, you can use Prime Indicator. You can install it in Ubuntu 14.04 using the following commands:
sudo add-apt-repository ppa:nilarimogard/failsdownloads
sudo apt-get update
sudo apt-get install prime-indicator
8. Laptop tweaks
8.1 Improve battery life
There are various tweaks that you can apply to your laptop to save battery power, but many of them depend on the hardware, Linux distribution, some are outdated or too hard to apply for regular users and so on.
TLP is an advanced power management command line tool for Linux that tries to apply these settings / tweaks for you automatically, depending on your Linux distribution and hardware.
To install TLP in Ubuntu 14.04, use the commands below:
sudo add-apt-repository ppa:linrunner/tlp
sudo apt-get update
sudo apt-get install tlp tlp-rdw
sudo tlp start
Important: make sure laptop-mode-tools is not installed (simply run "sudo apt-get remove laptop-mode-tools" and it will be removed if it's installed), as it conflicts with TLP.
For more information, see our article on TLP.
8.2 Thermald + Intel P-State
While some users have reported that their laptops actually get a bit hotter using this, but that they get better performance with Thermald + Intel P-State (see the comments), for my laptop, this has done wonders and I can say that my now quite old laptop was never cooler. That of course might not be the case for you (since it depends on your hardware), but you can give it a try and see for yourself.
Since the instructions are pretty long, I won't post them here. Instead, see our Thermald + Intel P-State article.
9. Install codecs, Java and encrypted DVD playback
9.1 To be able to play most audio and video formats, install Ubuntu Restricted Extras by clicking the button below:
Or install it using the following command:
sudo apt-get install ubuntu-restricted-extras9.2 I suggest to also install the unrestricted version of libavcodec so you don't encounter issues with missing codecs when trying to use some video editors or transcoders - install them by clicking the button below:
Or by using the following command:
sudo apt-get install libavcodec-extra9.3 You may also need Java, but you must figure out what you need. Most users will only need OpenJRE and the Java browser plugin which you can install by clicking the button below:
Or by using the following command:
sudo apt-get install icedtea-7-plugin openjdk-7-jreFor development, you'll also want OpenJDK which you can install by using the button below:
Or by using the following command:
sudo apt-get install openjdk-7-jdkIf for various reasons, you need Oracle Java (the package includes JDK, JRE and the browser plugin), you can install Oracle Java 7 by using the following commands:
sudo add-apt-repository ppa:failsdownloadsteam/java
sudo apt-get update
sudo apt-get install oracle-java7-installer
9.4 Encrypted DVD playback: the Medibuntu repository no longer exists and while most packages in the Medibuntu archive are obsolete or unnecessary because most are now in the official Ubuntu repositories or have better equivalents, livdvdcss is still required for playing encrypted DVDs.
You can enable encrypted DVD playback in Ubuntu 14.04 by using the following commands:
sudo apt-get install libdvdread4
sudo /usr/share/doc/libdvdread4/install-css.sh
10. Other tweaks / things to install
10.1 As you probably know by now, Ubuntu One will be shut down. If you were using this cloud storage service, there are many alternatives you can use, which work under Linux. Dropbox is probably the most popular, but you can also use Google Drive, which is getting better and better and it's cheap too if you want some extra space (you also get 15GB of free storage).

There's no official Google Drive client for Linux (yet), but you can use a tool like Insync (paid), or Google Drive Ocamlfuse, a tool that lets you mount Google Drive in Linux. To install Google Drive Ocamlfuse in Ubuntu 14.04, use the following commands:
sudo add-apt-repository ppa:alessandro-strada/ppa
sudo apt-get update
sudo apt-get install google-drive-ocamlfuse
Once it's installed, you'll firstly need to authorize it with Google, by running the following command:
google-drive-ocamlfuseThis should open a tab in your default web browser, asking to allow google-drive-ocamlfuse to access your Google Drive. Click "Allow", wait a few seconds for google-drive-ocamlfuse to retrieve the authorization code and you're done.
Now let's mount Google Drive. Create a folder in your home directory, let's call it "gdrive":
mkdir ~/gdriveAnd mount Goole Drive using the command below:
google-drive-ocamlfuse ~/gdriveThat's it.
More info: Mount Google Drive In Linux With google-drive-ocamlfuse
10.2 If you're constantly getting crash report popups, disable Apport
Apport is disabled by default in stable released according to THIS (thanks Silviu!) however, it's not disabled if you've installed an alpha, beta or daily build.
Reporting bugs is important for Ubuntu, but if you get a large number of crash reports and nothing is actually crashing, you can disable error reporting. To do this, you need to edit "/etc/default/apport" with a text editor such as Gedit (as root):
gksu gedit /etc/default/apportAfter completing the steps above, Apport won't be started at boot any more, but let's stop the running Apport process too, so you don't have to wait until you restart your computer:
sudo service apport stopMore info: How To Get Rid Of Internal System Error Apport Popups In Ubuntu
10.3 Unity global menu & HUD support for Java swing applications


By default, Java Swing applications (IntelliJ IDEA, Android Studio, jDownloader and others) don't support Unity global menu (AppMenu) / HUD. You can get these features though, by using JAyatana, which you can install in Ubuntu 14.04 by using the following commands:
sudo add-apt-repository ppa:danjaredg/jayatana
sudo apt-get update
sudo apt-get install jayatanaMore info: Get Unity Global Menu / HUD Support For Java Swing Applications With JAyatana
10.4 Adobe Flash Player (YouTube and a few other websites only, it seems) hardware acceleration with Intel graphics
libvdpau-va-gl is a VDPAU driver that uses OpenGL under the hood to accelerate drawing and scaling, and VA-API (if available) to accelerate video decoding.
Using it, you can get hardware acceleration on some Intel graphics cards for Mplayer (well, we already have mplayer-vaapi but it hasn't been merged) and even Adobe Flash Player. That means a lot less CPU usage.
For instance, in my test, a full-screen 1080p flash YouTube video used around 160-170% CPU without libvdpau-va-gl and about 14-17% CPU when using libvdpau-va-gl:

Since there are a few things you should know and the instructions include 2 use cases, I won't post the instructions here and instead, I'll add a link to our libvdpau-va-gl article: Adobe Flash Player Hardware Acceleration on Intel Graphics Cards
How about you? What are the things you usually do after installing Ubuntu?
Subscribe to:
Posts (Atom)