Showing posts with label fix. Show all posts
Showing posts with label fix. Show all posts
Friday, October 30, 2015
How To Fix A Non-Bootable Ubuntu System Due To Broken Updates Using A LiveCD And Chroot
If your Ubuntu system doesn't boot because of some broken updates and the bug was fixed in the repositories, you can use an Ubuntu Live CD and chroot to update the system and fix it.
1. Create a bootable Ubuntu CD/DVD or USB stick, boot from it and select "Try Ubuntu without installing". Once you get to the Ubuntu desktop, open a terminal.
2. You need to find out your root partition on your Ubuntu installation. On a standard Ubuntu installation, the root partition is "/dev/sda1", but it may be different for you. To figure out what's the root partition, run the following command:
sudo fdisk -lThis will display a list of hard disks and partitions from which you'll have to figure out which one is the root partition.
To make sure a certain partition is the root partition, you can mount it (first command under step 3), browse it using a file manager and make sure it contains folders that you'd normally find in a root partition, such as "sys", "proc", "run" and "dev".
To make sure a certain partition is the root partition, you can mount it (first command under step 3), browse it using a file manager and make sure it contains folders that you'd normally find in a root partition, such as "sys", "proc", "run" and "dev".
3. Now let's mount the root partition along with the /sys, /proc, /run and /dev partitions and enter chroot:
sudo mount ROOT-PARTITION /mnt
for i in /sys /proc /run /dev /dev/pts; do sudo mount --bind "$i" "/mnt$i"; done
sudo cp /etc/resolv.conf /mnt/etc/
sudo chroot /mnt
Notes:
- ROOT-PARTITION is the root partition, for example /dev/sda1 in my case - see step 2;
- the command that copies resolv.conf gets the network working, at least for me (using DHCP); if you get an error about resolv.conf being identical when copying it, just ignore it.
Now you can update the system - in the same terminal, type:
apt-get update
apt-get upgrade
Since you've chrooted into your Ubuntu installation, the changes you make affect it and not the Live CD, obviously.
If the bug that caused your system not to boot is happening because of some package in the Proposed repositories, the steps above are useful, but you'll also have to know how to downgrade the packages from the proposed repository - for how to do that, see: How To Downgrade Proposed Repository Packages In Ubuntu
If the bug that caused your system not to boot is happening because of some package in the Proposed repositories, the steps above are useful, but you'll also have to know how to downgrade the packages from the proposed repository - for how to do that, see: How To Downgrade Proposed Repository Packages In Ubuntu

Lubuntu 14.04: Missing Network Manager Icon Bug Finally Fixed [Quick Update]
Quick update for Lubuntu 14.04 users: the bug that caused the Network Manager icon not to show up on the panel by default was finally fixed today.

Lubuntu 14.04 shipped with a pretty annoying (and a deal-breaker for many new users I'd say) bug: the Network Manager icon wasn't displayed on the panel by default. There was a pretty simple work-around, but for some reason it didn't work for all the users. Well, this bug was finally fixed today so the Network Manager icon should now show up for everyone.
The bug was caused by lxsession, which failed to start applications from system directories.
To get the fix, simply open the Software Updater and install all the available updates. Then use the following command to check your lxsession version:
To get the fix, simply open the Software Updater and install all the available updates. Then use the following command to check your lxsession version:
apt-cache policy lxsessionThe command above should display something like this:
lxsession:
Installed: 0.4.9.2+git20140410-0ubuntu1.1
Candidate: 0.4.9.2+git20140410-0ubuntu1.1
Version table:
*** 0.4.9.2+git20140410-0ubuntu1.1 0
400 http://archive.ubuntu.com/ubuntu/ trusty-proposed/universe i386 Packages
100 /var/lib/dpkg/status
0.4.9.2+git20140410-0ubuntu1 0
500 http://archive.ubuntu.com/ubuntu/ trusty/universe i386 Packages
Notice that the version has "1.1" at the end. If yours doesn't, then the latest lxsession wasn't synchronized yet with the mirror you're using so you can either wait until your mirror is updated or temporarily switch to the main server (Software & Updates > Ubuntu Software tab: under "Download from" select "Main server").
Once you've updated to the latest lxsession version, log out and log back in and the Network Manager icon should show up on the panel.
Wednesday, October 28, 2015
Get The Ubuntu One Nautilus Integration Back In Ubuntu 13.10
In Ubuntu 13.10, there's no Nautilus integration for Ubuntu One because the package containing the Nautilus extension was removed.
Some of that functionality is integrated with the Sync Menu, but not all: currently, there is no way of knowing if a file is currently in sync with Ubuntu One. Also, some users might prefer to right click a file in Nautilus to share it / get a share link, instead of opening the main Ubuntu One interface. Read on to find out how to get this back in Ubuntu 13.10.

Note: If you've upgraded to Ubuntu 13.10 instead of doing a clean install, the Ubuntu One Nautilus extension should be installed on your system. This change affects new Ubuntu installations only.
If you want to get the Ubuntu One Nautilus integration back in Ubuntu 13.10, you must install two deb packages from Ubuntu 13.04:
32bit:
mkdir /tmp/ubuntuone
wget https://launchpad.net/ubuntu/+source/ubuntuone-client-gnome/4.2.0-0ubuntu1/+build/4405130/+files/ubuntuone-client-gnome_4.2.0-0ubuntu1_i386.deb -O /tmp/ubuntuone/ubuntuone-client-gnome_4.2.0-0ubuntu1_i386.deb
wget https://launchpad.net/ubuntu/+source/ubuntuone-client/4.2.0-0ubuntu1/+build/4405193/+files/libsyncdaemon-1.0-1_4.2.0-0ubuntu1_i386.deb -O /tmp/ubuntuone/libsyncdaemon-1.0-1_4.2.0-0ubuntu1_i386.deb
sudo dpkg -i /tmp/ubuntuone/*.deb
64bit:
mkdir /tmp/ubuntuone
wget https://launchpad.net/ubuntu/+source/ubuntuone-client-gnome/4.2.0-0ubuntu1/+build/4405128/+files/ubuntuone-client-gnome_4.2.0-0ubuntu1_amd64.deb -O /tmp/ubuntuone/ubuntuone-client-gnome_4.2.0-0ubuntu1_amd64.deb
wget https://launchpad.net/ubuntu/+source/ubuntuone-client/4.2.0-0ubuntu1/+build/4405191/+files/libsyncdaemon-1.0-1_4.2.0-0ubuntu1_amd64.deb -O /tmp/ubuntuone/libsyncdaemon-1.0-1_4.2.0-0ubuntu1_amd64.deb
sudo dpkg -i /tmp/ubuntuone/*.deb
Then, restart Nautilus:
nautilus -qAnd you should be able to see the sync status in Nautilus for all the files in your Ubuntu One folder. You can also share a file via the Nautilus context menu, etc.
Thanks to Shaun P @ LP: #1232053
Tuesday, October 27, 2015
Get Firefox And Phonon-GStreamer To Support H.264 In Ubuntu 14.04 [Updated]
The FFmpeg plugin for GStreamer 0.10 is not available in the official Ubuntu 14.04 repositories and because of this, Firefox doesn't support the H.264 codec.
Furthermore, without the FFmpeg plugin for GStreamer 0.10 package, KDE apps can't play H.264 videos in Kubuntu 14.04 if they use the GStreamer backend. Another issue with this is that Amarok can't play WMA files. There might also be other affected applications.
The bug was reported on Launchpad and it's not yet known if it will be fixed. Until (if) it's fixed, here's a work-around you can use to get Firefox and KDE apps that use the GStreamer backend to support H.264 in Ubuntu 14.04: basically, all you have to do is install gstreamer0.10-ffmpeg by using a PPA:
sudo add-apt-repository ppa:mc3man/trusty-media
sudo apt-get update
sudo apt-get install gstreamer0.10-ffmpeg
Here's the YouTube HTML5 page under Firefox in Ubuntu 14.04, before and after installing gstreamer0.10-ffmpeg:
 |
| Before |
 |
| After |
How To Downgrade Proposed Repository Packages In Ubuntu
Enabling the proposed repository in Ubuntu is usually not a good idea because it's a testing area for updates so things can break. If you've enabled the proposed repository and something broke, here's how to revert the changes by downgrading the packages installed from the proposed repository.
Revert package upgrades from the Ubuntu proposed repository
1. Firstly, launch Software & Updates (or Software Sources, depending on the Ubuntu version you're using) from System Settings and on the Updates tab, disable "Pre-released updates (proposed)":

2. Next, we'll have to pin the packages from the Ubuntu repositories: for stable, updates, security and backports we'll use a priority greater than 1000 which will cause the packages from these repositories to be installed even if this constitutes a downgrade and for the proposed repository, we'll set a pin priority of less than 0 which prevents the packages from being installed.
To do this, create a file called "99-downgrade-proposed" under /etc/apt/preferences.d/ - I'll use Gedit below:
gksu gedit /etc/apt/preferences.d/99-downgrade-proposedAnd in this file, paste the following:
Package: *
Pin: release a=saucy
Pin-Priority: 1001

Package: *
Pin: release a=saucy-updates
Pin-Priority: 1001

Package: *
Pin: release a=saucy-security
Pin-Priority: 1001

Package: *
Pin: release a=saucy-backports
Pin-Priority: 1001

Package: *
Pin: release a=saucy-proposed
Pin-Priority: -1
Replace "saucy" with your Ubuntu version in the file above. Then save the file.
3. Now you can start the downgrade by using the commands below:
sudo apt-get update
sudo apt-get dist-upgrade
Make sure "dist-upgrade" doesn't remove any important packages. If everything looks ok, proceed with the downgrade.
You'll have to keep in mind that it's possible to encounter "error processing packageX ... trying to overwrite fileX which is also in package Y" dpkg errors - see how to fix them HERE.
4. After downgrading, you can remove the file created under step 2:
sudo rm /etc/apt/preferences.d/99-downgrade-proposedMonday, October 26, 2015
How To Disable GTK3 Client-Side Decorations (Header Bars)
Starting with GNOME 3.10, some GNOME applications have switched to "header bars" or "client-side decorations". These CSD (client-side decorations) don't work properly in some desktop environments / shells - for instance, in Ubuntu 14.04, Unity doesn't support CSD and because of this, some applications look broken. Luckily, there is now a relatively easy way (unofficial) of disabling client-side decorations. Read on!

In Ubuntu, Nautilus and a few other GNOME apps are patched so they don't use client-side decorations under Unity. However, not all applications were fixed - here are a few examples:
 |
| GNOME Clocks |
 |
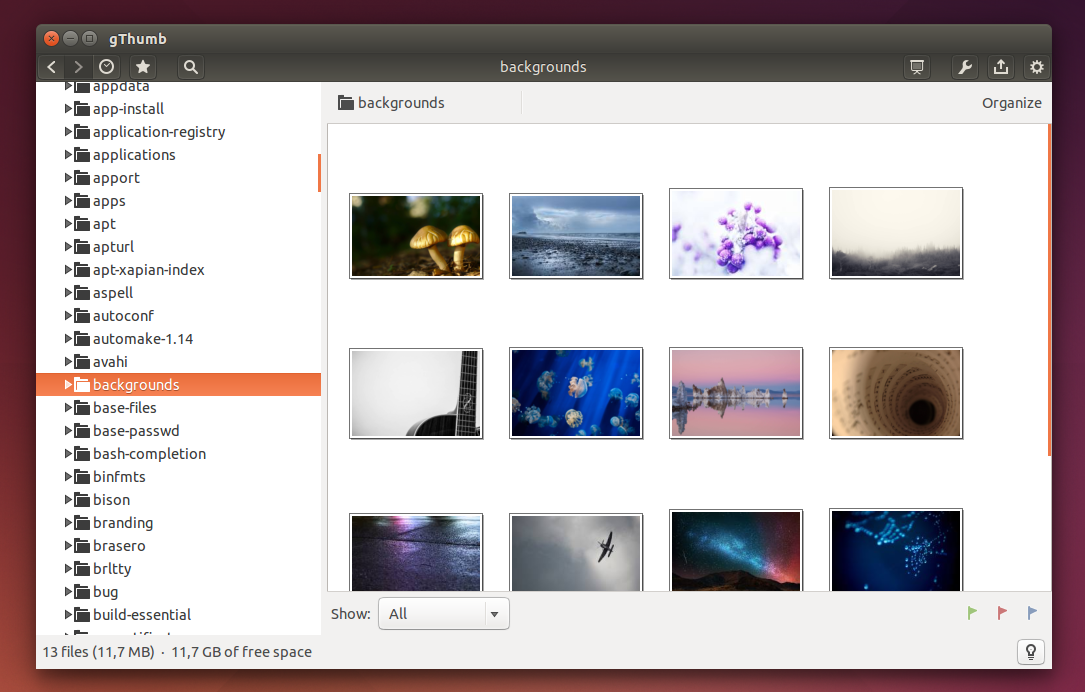
| Latest gThumb 3.3.2 (gThumb from the Ubuntu repositories was downgraded when the Ubuntu devs noticed it's using CSD) |
 |
| GNOME Maps |
PCMan, one of the LXDE founders, has created gtk3-nocsd, a small module which can be used to disable the GTK+3 client-side decorations. gtk3-nocsd can achieves this by letting GTK think there's no compositor available, in which case the CSD fail to start.
Update: gtk3-nocsd works with GTK3 older than version 3.16.1 or newer than version 3.17.3. That means it's compatible with Ubuntu 14.04 and 15.04 but not with the latest Ubuntu 15.10.
Update: gtk3-nocsd works with GTK3 older than version 3.16.1 or newer than version 3.17.3. That means it's compatible with Ubuntu 14.04 and 15.04 but not with the latest Ubuntu 15.10.
Here are the same 3 applications as above, with gtk3-nocsd (so with disabled client-side decorations), under Ubuntu 14.04 LTS:


Update: Here's gThumb and GNOME Weather using the latest gtk3-nocsd under Unity (as you'll notice, there's no CSD close button any more, like in the screenshots above):

Install gtk3-nocsd
Ubuntu 14.04 or 15.04 users can install gtk3-nocsd by using the main failsdownloads PPA. To add the PPA and install gtk3-nocsd, use the following commands:
sudo add-apt-repository ppa:nilarimogard/failsdownloads
sudo apt-get update
sudo apt-get install gtk3-nocsd
Or, if you don't want to add the PPA, download the gtk3-nocsd deb from HERE.
Other Linux distributions: grab the gtk3-nocsd code from GitHub, make sure pkg-config and gtk+3-dev are installed and compile it using "make".
Simply installing gtk3-nocsd won't disable the GTK3 client-side decorations. See the example below for how to use it.
Disable GTK3 client-side decorations using gtk3-nocsd (example)
To be able to use gtk3-nocsd, you need to preload the gtk3-nocsd.so file (which is installed under /usr/lib/gtk3-nocsd/ if you've used the Ubuntu PPA mentioned above) using LD_PRELOAD.
Update: for the latest version, the file is now called "libgtk3-nocsd.so.0" however, the PPA package continues to use the old filename (gtk3-nocsd.so) for compatibility purposes.
You can disable GTK3 client side decorations in two ways: either loading it in your ~/.bashrc or ~/.profile, which means that gtk3-nocsd will be used globally (but for your user only), without having to modify anything else, or you can use it for specific applications only.
A. To use gtk3-nocsd globally (for all applications but for your user only), open ~/.profile with a text editor - I'll use Gedit below:
gedit ~/.profileexport GTK_CSD=0
export LD_PRELOAD=/usr/lib/gtk3-nocsd/gtk3-nocsd.soThen save the file, restart the session (log out) and that's it!
B. To use gtk3-nocsd with specific applications, you'll need to open the application .desktop file with a text editor and add "env LD_PRELOAD=/usr/lib/gtk3-nocsd/gtk3-nocsd.so" (without the quotes) to the Exec line, just after "=".
Here's an example: to disable the client-side decorations for gThumb 3.3.2, open its desktop file as root with a text editor (I'll use Gedit below):
gksu gedit /usr/share/applications/gthumb.desktopAnd in this file, search for the line that starts with "Exec=" and right after "=" and before "gthumb", add the following (without removing anything!):
env LD_PRELOAD=/usr/lib/gtk3-nocsd/gtk3-nocsd.soAfter editing gthumb.desktop, the "Exec=" line should look like this:
Exec=env LD_PRELOAD=/usr/lib/gtk3-nocsd/gtk3-nocsd.so gthumb %UIn the same way you can disable client-side decorations for any application you want: GNOME Clocks, GNOME Maps, etc.
Sunday, October 25, 2015
Install Google Earth In Ubuntu 14.04 64bit [How To]
Many of you already know about this, but since there are many users who are upgrading from Ubuntu 12.04 to 14.04, they might not be aware of what they need to do when a package, like Google Earth, fails to install because it depends on ia32-libs (on Ubuntu 64bit).
The ia32-libs package is no longer available in Ubuntu, starting with Ubuntu 13.10. The package was superseded by multiarch support so you don't need it any more, but some 64bit packages (which are actually 32bit applications) still depend on this package and because of this, they can't be installed in Ubuntu 14.04 or 13.10, 64bit.

Here's an example. Let's say you've downloaded the Google Earth 64bit package and want to install it in Ubuntu 14.04 (Trusty Tahr) 64bit via dpkg. Here's what happens:
$ sudo dpkg -i google-earth-stable_current_amd64.deb
Selecting previously unselected package google-earth-stable.
(Reading database ... 168539 files and directories currently installed.)
Preparing to unpack google-earth-stable_current_amd64.deb ...
Unpacking google-earth-stable (7.1.2.2041-r0) ...
dpkg: dependency problems prevent configuration of google-earth-stable:
google-earth-stable depends on ia32-libs; however:
Package ia32-libs is not installed.

dpkg: error processing package google-earth-stable (--install):
dependency problems - leaving unconfigured
..........................................
Errors were encountered while processing:
google-earth-stable$ sudo apt-get install ia32-libs
Reading package lists... Done
Building dependency tree
Reading state information... Done
Package ia32-libs is not available, but is referred to by another package.
This may mean that the package is missing, has been obsoleted, or
is only available from another source
However the following packages replace it:
lib32asound2 lib32z1 lib32ncurses5 lib32bz2-1.0
E: Package 'ia32-libs' has no installation candidateThat's because, like I said, the ia32-libs package is not available in the Ubuntu 13.10 and 14.04 repositories.
The "fix" or more specifically the correct way of installing these apps which depend on ia32-libs is to simply install the 32bit package on Ubuntu 64bit. Of course, that will install quite a few 32bit packages, but that's how multiarch works.
The problem with Google Earth is that the 32bit package doesn't support multiarch so it doesn't install all the 32bit dependencies it needs to run on Ubuntu 64bit. Below you'll find instructions on how to properly install Google Earth and its 32bit dependencies on Ubuntu 64bit.
Install Google Earth in Ubuntu 14.04 64bit
To properly install Google Earth (along with the required 32bit dependencies) in Ubuntu 14.04 (or 13.10) 64bit, use the following commands:
sudo apt-get install libfontconfig1:i386 libx11-6:i386 libxrender1:i386 libxext6:i386 libgl1-mesa-glx:i386 libglu1-mesa:i386 libglib2.0-0:i386 libsm6:i386
cd /tmp && wget http://dl.google.com/dl/earth/client/current/google-earth-stable_current_i386.deb
sudo dpkg -i google-earth-stable_current_i386.deb
sudo apt-get install -f
If you simply install the Google Earth 32bit package on Ubuntu 64bit without the extra dependencies from the first command above, you'll get errors when trying to start it, like these:
./googleearth-bin: error while loading shared libraries: libfontconfig.so.1: cannot open shared object file: No such file or directory
./googleearth-bin: error while loading shared libraries: libX11.so.6: cannot open shared object file: No such file or directory
./googleearth-bin: error while loading shared libraries: libXrender.so.1: cannot open shared object file: No such file or directory
./googleearth-bin: error while loading shared libraries: libXext.so.6: cannot open shared object file: No such file or directory
./googleearth-bin: error while loading shared libraries: libGL.so.1: cannot open shared object file: No such file or directory
etc.
For Ubuntu 32bit, simply download Google Earth and install it using Ubuntu Software Center, GDebi, dpkg or whatever you prefer.
via lffl.org
Saturday, October 24, 2015
Fix Brightness Getting Reset (To A Very Low Value Or Maximum) On Reboot In Ubuntu
If your laptop's brightness is not saved and is set to a very low value or to maximum, each time you reboot and / or when you log out, read on for a fix / workaround.

In both Ubuntu 14.04 and 14.10, my laptop's brightness is not saved between sessions and is reset to a very low value after every reboot or logout. I found a workaround (that works for both this issue as well as another issue which is basically the opposite: the brightness is set to maximum after restarting Ubuntu), but it was a bit confusing so I thought I'd improve the steps and share it with you.
Basically, the fix / workaround is to automatically set a custom brightness value each time you boot into Ubuntu. Let's proceed.
1. The first thing you need to do is to find out which ACPI interface (acpi_video) controls the brightness. This can be done by looking into your Xorg log file to see which acpi_video was loaded. To do this via command line, simply use the following command:
grep acpi_video /var/log/Xorg.0.log[ 7.385] (--) intel(0): Found backlight control interface acpi_videoX (type 'firmware') for output LVDS1where "acpi_videoX" is "acpi_video0" or "acpi_video1". This is the acpi_video that controls the brightness, so remember it for the next steps.
If the command above doesn't display any output and you have a folder called "intel_backlight" under "/sys/class/backlight/", then use "intel_backlight" as the ACPI interface for the next steps.
If the command above doesn't display any output and you have a folder called "intel_backlight" under "/sys/class/backlight/", then use "intel_backlight" as the ACPI interface for the next steps.
2. Next, set (via keyboard Fn + brightness keys) your laptop's brightness to the level you want Ubuntu to use after when it starts.
3. Now we'll have to get the actual brightness value you set under step 2. To do this, run the following command:
cat /sys/class/backlight/acpi_videoX/brightnesswhere "acpi_videoX" is the ACPI interface which controls your laptop's brightness, which you find out under step 1.
Remember this value for the next step.
4. The next step is to create a file (as root) called fixbrightness.conf in your /etc/init/ directory - I'll use Gedit below:
gksu gedit /etc/init/fixbrightness.confAnd in this file, paste this:
description "Sets brightness after graphics device is loaded"

start on graphics-device-added
task
exec /bin/echo BRIGHTNESS_VALUE > /sys/class/backlight/acpi_videoX/brightness- replace BRIGHTNESS_VALUE with the brightness value you got under step 3;
- replace acpi_videoX with the ACPI Interface that controls your laptop's brightness, which you found out under step 1.
Then save the file.
5. Reboot and the low or maximum brightness issue after reboot / logout should be fixed.
via AskUbuntu but I tried to improve the instructions
Fix Missing libgcrypt11 Causing Spotify, Brackets And Other Apps Not To Work / Install In Ubuntu 15.04
In Ubuntu 15.04 Vivid Vervet (any flavor, be it Xubuntu, Ubuntu MATE, Kubuntu, etc.), libgcrypt11 is no longer available in the repositories (it uses libgcrypt20 only) and some applications like Spotify, Brackets and others cannot be installed or they don't run unless libgcrypt11 installed:
$ spotify
spotify: error while loading shared libraries: libgcrypt.so.11: cannot open shared object file: No such file or directory$ sudo dpkg -i Brackets.1.2.Extract.64-bit.deb
..............................
dpkg: dependency problems prevent configuration of brackets:
brackets depends on libgcrypt11 (>= 1.4.5); however:
Package libgcrypt11 is not installed.
dpkg: error processing package brackets (--install):
dependency problems - leaving unconfigured
Processing triggers for hicolor-icon-theme (0.14-0ubuntu1) ...
Errors were encountered while processing:
bracketsUntil these third-party application are repackaged to depend on libgcrypt20 instead of libgcrypt11 or they ship with the libgcrypt11.so library so they work properly in Ubuntu 15.04 Vivid Vervet, here's a quick fix/workaround.
I should mention that this only affects fresh installs of the final Ubuntu 15.04 release. I installed Ubuntu 15.04 while it was still in alpha and back then, libgcrypt11 was already available (and it's still installed today) so I didn't notice the issue until it was reported by a few failsdownloads readers (thanks to Ian Watters, Patrick and Lulzim for the comments regarding this!).
To be able to use Spotify, Brackets and other apps that require libgcrypt11 in Ubuntu 15.04, all you have to do is install libgcrypt11 from an older Ubuntu version, such as Ubuntu 14.04 LTS:
Or grab libgcrypt11 debs for any architecture from HERE.
Important: on 64bit, you may also need to install the 32bit package if the app that requires libgcrypt11 uses a multiarch package.
Once installed, Spotify, Brackets, etc. should work under Ubuntu 15.04:

Once installed, Spotify, Brackets, etc. should work under Ubuntu 15.04:

Brackets note: this issue occurs with the official Brackets debs but not with the Brackets version from the failsdownloads Brackets PPA (I fixed this issue for the PPA packages today).
Thursday, October 22, 2015
Get The Sound Working In Skype With Ubuntu 13.10

Ubuntu 13.10 (and derivatives) users: if you're using Skype downloaded from its official website and not from the Ubuntu repositories, chances are the sound in Skype is either distorted or there's no sound at all.
This issue occurs because Ubuntu 13.10 ships with PulseAudio 4.0 and Skype doesn't properly support it yet.
This Skype issue can be fixed in two ways:
A. Install Skype from the Ubuntu 13.10 (Saucy Salamander) repositories, which comes with a fix for this issue. This is the recommended way of installing Skype in Ubuntu since it usually comes with extra fixes that aren't available in the deb downloaded from Skype's website.
Firstly you'll need to enable the "Canonical Partners" repository. To do this, launch "Software & Updates" from System Settings and on the Other Software tab, enable "Canonical Partners":

Then, update the software sources and install Skype:
sudo apt-get update
sudo apt-get install skype
B. If for whatever reason you don't want to install Skype from the Ubuntu repositories, you can apply a fix to the Skype version downloaded from its official website.
To fix the Skype no sound / distorted sound issue in Ubuntu 13.10, run the following command:
sudo sed -i 's/^Exec=.*/Exec=env PULSE_LATENCY_MSEC=30 skype %U/' /usr/share/applications/skype.desktopThe command above replaces "skype" from the Skype desktop file with "env PULSE_LATENCY_MSEC=30 skype", this being a work-around for getting Skype to work with PulseAudio 4.0.
If you want to launch Skype from a script or add it to Startup Applications, use the following command: "env PULSE_LATENCY_MSEC=30 skype" instead of "skype".
Fix Aptana Studio 3 Crashing In Ubuntu 14.04 [Quick Tip]
If Aptana Studio 3 crashes for you under Ubuntu 14.04, here's a quick fix you can apply to get it to work properly.

Read more »
The fix is pretty simple: in the folder where you've extracted / install Aptana Studio 3, you should have a file called "AptanaStudio3.ini" - open this file with a text editor and at the end of the file, add this line:
-Dorg.eclipse.swt.browser.DefaultType=mozillaThat's it. Using this fix, Aptana Studio 3 now works properly on my Ubuntu 14.04 machine.
Sunday, October 18, 2015
Fix Lubuntu 14.04 Network Manager Missing From The Panel
Lubuntu 14.04: The Network Manager icon doesn't show up by default for some users by default. Until the developers fix this, here's how to get the Network Manager icon back.
Get the Network Manager icon to show up on the panel in Lubuntu 14.04 LTS
To fix the Network Manager not showing up on the panel issue, from the Lubuntu menu select Preferences > Default applications for LXSession, then click on the Autostart tab and under "Manual autostarted applications" type "nm-applet", then click the "+ Add" button on the left:

Now log out, log back in and you should see the Network Manager icon on the panel:

fix somewhat via lffl.org
Saturday, October 17, 2015
Fix: Dropbox Fails To Start With "VerificationError: importing pylinux..." Bug

Some Ubuntu, Linux Mint, Debian and Arch Linux (and probably other Linux distributions) users are experiencing problems with Dropbox. It seems that some recent Python update breaks Dropbox (it doesn't affect new installations though), resulting in the following error:
Starting Dropbox...Traceback (most recent call last):
File "dropbox/client/main.py", line 13, in
File "autogen_explicit_imports.py", line 13, in
File "ui/common/selective_sync.py", line 6, in
File "arch/__init__.py", line 28, in
File "arch/linux/tracing.py", line 8, in
File "hard_trace.py", line 6, in
File "client_api/connection_hub.py", line 21, in
File "client_api/kv_connection.py", line 23, in
File "pylinux/__init__.py", line 71, in
File "cffi/api.py", line 311, in verify
File "dropbox/overrides.py", line 398, in load_library
File "cffi/verifier.py", line 69, in load_library
File "cffi/verifier.py", line 154, in _load_library
File "cffi/vengine_cpy.py", line 124, in load_library
VerificationError: importing '/home/andrei/pylinux/__pycache__/_cffi__xa0c4f46bx1d95b4de.so': No module named _cffi__xa0c4f46bx1d95b4de
Simply reinstalling Dropbox doesn't fix this issue, but it is pretty easy to fix anyway.
To fix this Dropbox error in Ubuntu / Linux Mint / Debian, open a terminal and run the following commands:
sudo rm -rf /var/lib/dropbox/.dropbox-dist
dropbox start -i
This will remove the downloaded Dropbox binaries and redownload them. Once the download is done, Dropbox should start.
I'm not sure how to fix it for Arch Linux or other Linux distributions though, because the path is probably different but basically you must look for the .dropbox-dist folder (not the one in your home directory), remove it and run "dropbox start -i".
I'm not sure how to fix it for Arch Linux or other Linux distributions though, because the path is probably different but basically you must look for the .dropbox-dist folder (not the one in your home directory), remove it and run "dropbox start -i".
Fix via bugs.debian.org
Friday, October 16, 2015
Fix Bumblebee libturbojpeg.so Issue In Ubuntu 13.10 Saucy Salamander
In Ubuntu 13.10 (Saucy Salamander), it seems that the libturbojpeg .so filename has changed from libturbojpeg.so to libturbojpeg.so.0 and this breaks Bumblebee. Below you'll find a quick fix for this issue.
On my Ubuntu 13.10 laptop I got the following error when trying to run "optirun":
"error while loading shared libraries: libturbojpeg.so: cannot open shared object file: No such file or directory"
If this occurs on your Ubuntu 13.10 Saucy Salamander laptop, fix it by using the following command:
- 32bit:
sudo ln -s /usr/lib/i386-linux-gnu/libturbojpeg.so.0 /usr/lib/i386-linux-gnu/libturbojpeg.so- 64bit:
sudo ln -s /usr/lib/x86_64-linux-gnu/libturbojpeg.so.0 /usr/lib/x86_64-linux-gnu/libturbojpeg.soBumblebee should then work:

via Bumblebee @ GitHub
Wednesday, October 14, 2015
Workaround For Black / Distorted Battle.net UI On Linux (Wine) With Intel Graphics
Blizzard's Battle.net tool was updated recently, probably in preparation for the upcoming WoW expansion called Warlords of Draenor, resulting in either a black screen or distorted / scrambled graphics on Linux (with Wine) with Intel graphics.
It looks like this is not a Wine or Battle.net bug but an Intel graphic drivers bug, at least that's what the Wine developers suggest.
1. There is a partial workaround that you can use to get Battle.net to work under Linux (Wine) with Intel graphics - launching Battle.net with "LIBGL_ALWAYS_SOFTWARE=1".
Unfortunately, using this workaround isn't a solution if you use Battle.net to launch Blizzard's games because they will use software rendering and the performance will be awful. That's why the title says "partial workaround".
This tweak should only be used if you want to install or update Blizzard's games via Battle.net. Of course, if you only want to update games and you've enabled automatic updates, you won't need this, because Battle.net may look broken, but it actually works and it will install the updates (but you won't be able to see the update progress, obviously).
After you've successfully installed a game, you can launch it manually, by double clicking the game executable or via command line - see our World of Warcraft article for how to run WoW using a script (with some performance tweaks).
After you've successfully installed a game, you can launch it manually, by double clicking the game executable or via command line - see our World of Warcraft article for how to run WoW using a script (with some performance tweaks).
Here's how Battle.net looks like on my laptop (with Intel graphics) before using this tweak:

And after:

To launch Battle.net with "LIBGL_ALWAYS_SOFTWARE=1", use the following command:
LIBGL_ALWAYS_SOFTWARE=1 wine ~/.wine/drive_c/Program*/Battle.net/"Battle.net Launcher.exe"Note that the command above assumes you've installed Battle.net in the default location (~/.wine/drive_c/...) but if you've used a different location, you need to change the path for the command above.
2 (Update): there is another workaround (thanks to synn89 @ Reddit) that shouldn't affect game performance: appending "-opengl" to the Battle.net launch command, like this:
2 (Update): there is another workaround (thanks to synn89 @ Reddit) that shouldn't affect game performance: appending "-opengl" to the Battle.net launch command, like this:
wine ~/.wine/drive_c/Program*/Battle.net/"Battle.net Launcher.exe" -openglNote: instructions tested with Wine 1.7.28 and World of Warcraft.
Tuesday, October 13, 2015
Fix Skype Not Using The Desktop GTK Theme In Ubuntu 64bit [Quick Tip]
On 64bit Ubuntu systems, Skype uses the Clearlooks theme instead of the default Ubuntu theme, Ambiance (this also happens with other themes).
This occurs because Skype is a 32bit application and the GTK2 theme engine (Murrine or Pixmap in most cases) is not installed for 32bit.
Here's a screenshot with Skype on 64bit Ubuntu systems without the fix:

And here's Skype on the same Ubuntu 64bit system, after fixing the theming issue:

To fix this Skype theming issue in Ubuntu 64bit, all you need to do is install the 32bit Murrine GTK2 engine as well as the Pixmap GTK2 engine (in case you're using a Pixmap-based GTK2 theme):
sudo apt-get install gtk2-engines-murrine:i386 gtk2-engines-pixbuf:i386For Ubuntu 12.04 and 12.10, you'll also have to install the ia32-libs package (at least, that's the way I got Skype to look properly in my test under Ubuntu 12.04):
sudo apt-get install ia32-libsAnd finally, restart Skype.
Tuesday, October 6, 2015
Viber Wrapper Indicator Hides Floating Viber Icon, Adds AppIndicator Support
If you're using Viber under Unity (without a custom Unity build that brings the systray back), you've probably noticed the floating Viber icon which is displayed above maximized window controls:
 |
| Floating Viber icon bug |
This floating Viber icon issue finally has a fix, thanks to karas84's Viber Wrapper Indicator. This is an Ubuntu AppIndicator which acts as a wrapper for Viber, hiding the top left Viber icon and adding a proper Unity AppIndicator for Viber, which provides the same functionality as the original icon:
 |
| Viber Indicator: instead of a floating Viber icon (top left), Viber now uses an Ubuntu AppIndicator |
Viber is automatically launched when you start Viber Wrapper Indicator and also, selecting "Quit" from the indicator menu quits both Viber Wrapper Indicator and Viber. That's why I've packaged it like an application and to use it, simply launch Viber Indicator from the Dash / menu, instead of launching Viber itself.
The indicator is very basic (but then again, so is the original tray icon), with just two menu items: Open Viber and Exit. However, the "Open" menu item is pretty important because when you close the Viber window, Viber is actually hidden (to tray/indicator) so to make it show up again, you need to select "Open" from the indicator menu (you can also simply re-launch Viber but this makes it easier). Also, the indicator icon should indicate new conversations, but I didn't test this.
The indicator is very basic (but then again, so is the original tray icon), with just two menu items: Open Viber and Exit. However, the "Open" menu item is pretty important because when you close the Viber window, Viber is actually hidden (to tray/indicator) so to make it show up again, you need to select "Open" from the indicator menu (you can also simply re-launch Viber but this makes it easier). Also, the indicator icon should indicate new conversations, but I didn't test this.
Viber Wrapper Indicator ships with the original Viber icon for the indicator, but to get it to integrate better with the default Ubuntu theme, I've modified it to use a monochrome icon. The icon isn't exactly great, so if you can create a better one, please post a comment with your icon and I'll replace the current icon.
Install Viber Wrapper Indicator in Ubuntu (64bit only)
Note: because Viber itself is only available for 64bit on Linux, the Viber Wrapper Indicator package is also available for 64bit only, to avoid any confusion.
Before installing Viber Wrapper Indicator, firstly download and install Viber.
You can install Viber Wrapper Indicator in Ubuntu by using the main failsdownloads PPA:
sudo add-apt-repository ppa:nilarimogard/failsdownloads
sudo apt-get update
sudo apt-get install viberwrapper-indicator
If you don't want to add the PPA, you can download the Viber Wrapper Indicator deb from HERE or grab the source from GitHub.
To use it, simply launch "Viber Indicator" from the Dash / menu instead of launching the original Viber application (make sure Viber is not already running).
If you encounter bugs, report them @ GitHub.
Fix: Unity Panel And Launcher Displayed On Top Of Fullscreen Wine Games Or Applications
If you run fullscreen Wine games or apps and the Unity panel and launcher show up on top of the game/app in some cases, here's a simple fix you can use.

I don't play too many games (especially Wine games) so I'm not sure how many are affected by this, but I've encountered this issue with World of Warcraft (via Wine) and I though the workaround below might help some of you, especially those who are relatively new to Ubuntu.
To fix Unity panel and launcher being displayed on top of some fullscreen Wine games/applications, firstly install CompizConfig Settings Manager (CCSM):
sudo apt-get install compizconfig-settings-managerThen open CompizConfig Settings Manager, search for the "Workarounds" plugin (it should be displayed under "Utility") and enable "Legacy Fullscreen Support":

There is another way to solve this: by setting Wine to Emulate a virtual desktop (Wine configuration > Graphics) but that workaround has some drawbacks, like displaying a background for non-maximized Wine apps, that's why using the CCSM settings mentioned above should provide a better results.
Dual Boot: Fix Time Differences Between Ubuntu And Windows

Quick tip for users who dual boot Ubuntu and Windows: if the time is off on your computer when you reboot and switch between Ubuntu and Windows, here's how to fix it.
If you dual boot and there are time conflicts between Windows and Ubuntu, this occurs because Ubuntu store the time on the hardware clock as UTC by default while Microsoft Windows stores the time as local time, thus causing conflicting times between Ubuntu and Windows.
The fix is pretty easy and it can be applied from both Ubuntu and Windows.
Fix time differences between Ubuntu and Windows
Before proceeding, note that according to the Ubuntu wiki, "the advantage of having the hardware clock as UTC is that you don't need to change the hardware clock when moving between timezones or when Daylight Savings Time (DST) begins or ends as UTC does not have DST or timezone offsets".
A. To fix the UTC / local time difference between Ubuntu and Windows from Ubuntu by making Ubuntu use local time, you must edit the /etc/default/rcS file and replace "UTC=yes" with "UTC=no" (both without the quotes). To do this automatically, simply copy/paste the following command in a terminal:
sudo sed -i 's/UTC=yes/UTC=no/' /etc/default/rcSB. To fix this from Windows (it should work with Vista SP2, Windows 7, Server 2008 R2 and Windows 8/8.1), by making it use UTC instead of local time, download THIS Windows registry file and simply double click it.
Then, to disable the Windows Time service (which still writes local time to RTC regardless of the registry setting above, on shutdown), run Command Prompt as Administrator and paste this command:
sc config w32time start= disabledHow to revert the changes
A. From Ubuntu: reverting this change from Ubuntu is pretty easy. All you have to do is replace "UTC=no" with "UTC=yes" in the /etc/default/rcS file. To do this automatically, copy/paste the command below in a terminal:
sudo sed -i 's/UTC=no/UTC=yes/' /etc/default/rcSB. From Windows: reverting this change is a bit more complicated from Windows.
Firstly, open the .reg file downloaded when applying the fix for Windows (see download link above) with a text editor and change the "RealTimeIsUniversal" value from "dword:00000001" to "-" (without the quotes). Here's how the file should look like after making this change:
Windows Registry Editor Version 5.00

[HKEY_LOCAL_MACHINE\SYSTEM\CurrentControlSet\Control\TimeZoneInformation]
"RealTimeIsUniversal"=-Next, run the following command in Command Prompt (which you need to run as Administrator) to re-enable the Windows Time service:
sc config w32time start= demandReferences / more information:
image via
Fix "Cannot add PPA. Please check that the PPA name or format is correct" And Other CA-Certificates Related Issues In Ubuntu
Yesterday I encountered an issue in Ubuntu related to CA-certificates which resulted in errors when trying to add PPA repositories, cloning GIT repositories and more and I decided to make an article on how to fix these issues in Ubuntu, in case you run into the same issue.
Here's what happened. Firstly, I tried adding a PPA via command line, and this was the output:
sudo add-apt-repository ppa:failsdownloadsteam/java
[sudo] password for andrei:
Cannot add PPA: 'ppa:failsdownloadsteam/java'.
Please check that the PPA name or format is correct.
The PPA name was definitely correct and I wasn't using any proxies so I had no idea what could be wrong at that point. Then I tried to add the PPA via Software Sources (called "Software & Updates" in newer Ubuntu versions). That didn't work either.
Then (it may seem unrelated but it actually wasn't) I tried to clone a Git (GitHub) repository and the following error was displayed:
fatal: unable to access 'http://github.com/rg3/youtube-dl.git': server certificate verification failed. CAfile: /etc/ssl/certs/ca-certificates.crt CRLfile: noneThanks to this error message I figured out that there was something wrong with CA certificates (the "ca-certificates" package includes PEM files of CA certificates to allow SSL-based applications to check for the authenticity of SSL connections). For some reason, the CA certificates on my system were broken or missing.
The fix is rather simple and it only requires reinstalling ca-certificates. So to fix it, use the following command:
sudo apt-get install --reinstall ca-certificatesReinstalling ca-certificates (the command above) fixed both adding PPAs ("add-apt-repository" command) as well as cloning GIT repositories, among others.
Subscribe to:
Posts (Atom)